
Navigating With the ADF
 The LF navigation system was so durable that for twenty years it had no competition. It was widely used long after VOR installations began to sprout up throughout the country. It has the major advantage over a VOR in that reception is not limited to line of sight distances. The LF signals follow the curvature of the earth, and thus the maximum distance that an ADF is usable depends only on the power of the beacon.
Additionally, the ADF indicator provides more information than the VOR indicator. Here it shows that the aircraft is on a 345° heading and that the magnetic bearing to the NDB is 060°.
When I was doing my Instrument Flight training many students dreaded NDB procedures. They hoped that the FAA examiner would "forget" to test those skills. To my knowledge they never "forgot." Currently, it is mandatory to successfully demonstrate an NDB approach on the instrument flight test.
On reflection, one wonders why emotions ran—and run!—so negatively towards ADF procedures. In some aspects it is simpler to track to or from an NDB than to or from a VOR. The VOR, of course, offers the advantage that one can set in the desired radial with the OBS, leaving little doubt that the track to or from the station is correct.
Six ADF navigation procedures will be reviewed here.
- ADF Time- and Distance-to-Station checks.
- Intercepting a bearing.
- Homing.
- Tracking inbound to an NDB.
- Tracking outbound from an NDB.
- NDB Approaches.
On first reading the descriptions, ADF procedures could appear difficult. With modest practice on your Flight Simulator, though, they become routine. They even make sense! The key to successful ADF navigation is to know where you are at all times. Visualization is a must to make the right moves.
Four types of ADF Indicators are in use. In every case, the needle points to the navigation beacon.
- Fixed Compass Card.
- Rotatable Compass Card.
- Single-needle Radio Magnetic Indicator.
- Dual-needle Radio Magnetic Indicator.
Fixed Compass Card
 The Fixed Indicator's compass card is exactly as the name says. It is fixed to the face of the instrument and cannot rotate; 0° is always straight up—the nose of the aircraft. Visualizing the situation with this type of indicator can be daunting.
Consider the present situation. Remember, all numbers are relative to the aircraft's magnetic heading. From before, the aircraft is heading 345°. The ADF indicator shows the beacon 75° relative to the aircraft's heading. Since the beacon is to the right, add numbers: 345 plus 75 equal 420. Subtract 360 and the magnetic bearing to the beacon is 060°. It's enough of a mental calculation sitting at a desk; in a pitching aircraft glopping about in the soup, the math can seem impossible. Some consider using this type of ADF Indicator as cruel and unusual punishment: great as an emergency backup, very unsatisfactory for every-day use.
The fixed-indicator can still be found on many aircraft panels, but seldom in planes where the pilot actually uses the ADF.
Rotatable Compass Card
 The Rotatable Compass Card Indicator was a big step over the fixed-card indicator. The pilot can now rotate the compass card with the heading knob to display the aircraft’s magnetic heading "straight up." Then the ADF needle will directly indicate the magnetic bearing to the NDB. For example, again the aircraft is on a 345° heading. The pilot manually rotates the ADF card to show a 345° heading as shown here. The magnetic bearing to the beacon now correctly shows as 060°.; Now, to track to the beacon simply turn the aircraft to a heading of 060°—ignoring any wind correction requirements for the moment ... just remember to rotate the compass card to the new aircraft heading of 060° after the turn.
Single-needle Radio Magnetic Indicator
 The Single-Needle Radio Magnetic Indicator is the best of all worlds. The Radio Magnetic Indicator, as its name implies, is an instrument that combines radio and magnetic information to provide continuous heading, bearing, and radial information. It is an extremely simple indicator.
The Indicator’s compass card is a directional gyro and so it rotates automatically as the aircraft turns. Thus it always accurately indicates the magnetic heading of the aircraft as well as the magnetic bearing to the beacon. Although it's a "hands-off" instrument, its compass card should be checked against the magnetic compass every fifteen minutes or so and adjusted with the heading knob to correct for any precession errors common to directional gyros. The face of the single-needle RMI is similar to that of the rotatable card ADF just shown.
The ADF gauge on the Cessna Nav Trainer panel is a single-needle Radio Magnetic Indicator. The illustration here includes the digital display added to the RMI which indicates the bearing to the station. The digital display is not a standard feature on an RMI. It was included here because precisely reading the RMI is such an integral part of the practice flights.
Dual-needle Radio Magnetic Indicator
 The dual-needle RMI is similar to the single-needle RMI except that it has a second needle. The instrument here presents the same information as the two previous instances: aircraft heading is 345°, and the magnetic bearing to the NDB is 060°—the yellow needle. The second needle, green here, typically points to a VOR station tuned in on the Navigation Receiver—in this case, fly 303° to get to the VOR. The dual-needle indicator is particularly useful in fixing the location of an aircraft. The two lines of position appear right on the face of the gauge.
Sophisticated RMIs show magnetic bearing to any two nav stations chosen by the pilot: ADF and VOR#1, ADF and VOR#2, or VOR#1 and VOR#2. Military pilots routinely navigate with an RMI and wonder why the rest of us fool around with a standard VOR indicator.
The dual-needle RMI is similar to the single-needle RMI except that it has a second needle. The instrument here presents the same information as the two previous instances: aircraft heading is 345°, and the magnetic bearing to the NDB is 060°—the yellow needle. The second needle, green here, typically points to a VOR station tuned in on the Navigation Receiver—in this case, fly 303° to get to the VOR. The dual-needle indicator is particularly useful in fixing the location of an aircraft. The two lines of position appear right on the face of the gauge.
Sophisticated RMIs show magnetic bearing to any two nav stations chosen by the pilot: ADF and VOR#1, ADF and VOR#2, or VOR#1 and VOR#2. Military pilots routinely navigate with an RMI and wonder why the rest of us fool around with a standard VOR indicator.
Characteristics of ADF Navigation
Please note, that from here on, all ADF discussions and mathematics is limited to navigation using a single-needle RMI.
The most important concept in ADF navigation is that the needle always points to the station. There are three implications to this.
- First, when tuned to an ADF station for homing, tracking, intersections, holding or an approach, you never have to touch the system. Unlike the VOR, there’s no OBS to think about, no need to "twist" anything in station passage or at any other time. This makes the ADF much simpler to use.
- Second, with an ADF you always know where you are in relation to the station. There is no TO-FROM to interpret, no confusion about radials and bearings, no way to set the wrong OBS numbers.
- Third, ADF orientation is much simpler than VOR orientation. With an RMI the head of the ADF needle always indicates the bearing to the station. Simply turn to the heading under the arrow head to fly towards the beacon.
ADF Time and Distance Checks
Good exercises to develop NDB awareness are the ADF Time and Distance Checks. Tune in an NDB station, verify its Morse identifier, (Click the ID label in the center of the radio face) and then position the aircraft so that the needle points directly to the left or right, indicating that the station is directly off the aircraft’s wing.
Note the bearing to the station and also the time, or set the timer. Then fly a constant heading until the bearing changes 10°.; Note the number of seconds it takes for the bearing to change this 10°.; Then simply divide that elapsed time by ten to determine the time to station in minutes.
You can then estimate the distance to the station:
A Time and Distance Example
- You’re en route from New Bedford, Mass. to Manchester, N.H., tracking the 005° bearing to the Haget beacon. Company-President Mr. Benjamin Counter is your sole passenger. Part-way into the flight Mr. Counter decides that a face-to-face meeting would be appropriate with the principal-stockholder, Mr. Well Thee. Mr. Thee is vacationing in Provincetown, on Cape Cod, with his administrative assistant. This working arrangement was mentioned in the Route-selection section.
- For the Time and Distance to Provincetown, tune in and verify the Provincetown beacon. Then—in this case—turn to a 025° heading to put Provincetown’s beacon directly off your right wing. The ADF indicator shows a 115° bearing to the beacon. Start the timer.
- Maintain a 025° heading. When the ADF needle has shifted ten degrees, to a 125° bearing to the station, note the time—three minutes and forty seconds, or 220 seconds.
You can then estimate the distance to the station:
With Mr. Counter on board—"Bean" Counter to all who are out of his hearing range, the aircraft is cruising at an economical 110 kts. The distance to Provincetown's beacon is then:
One can only hope that Mr. Counter is not inspired to again change your destination before reaching Provincetown.
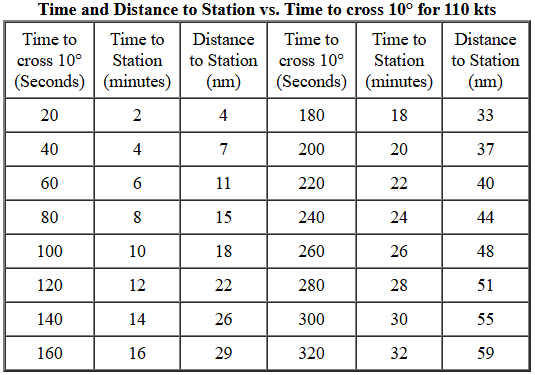
As seen, the calculations for time and distance to station are quite simple. What's even easier is to read those numbers from a table. Since you're flying the Cessna Nav Trainer which cruises at 110 kts, a table can be prepared with a spreadsheet showing both time to station and distance to station for any value of time to cross 10°. The table below is for 20-second increments of time to cross 10° but it is just as easy to use your spreadsheet and prepare it for 10 or 15 second increments, interpreting for the in-between values.
If your aircraft differs from the Cessna Nav Trainer, just redo the Distance to Station columns for the appropriate cruise speed. The Time to Station column is independent of speed.
Intercepting a Bearing
 Probably the most common ADF navigation procedure is intercepting a specific bearing of a Non Directional Beacon. The technique is similar whether intercepting an inbound bearing or an outbound bearing.
Until this easily-understood maneuver is learned, VFR approaches to an airport will be sloppy, and all but impossible in IFR conditions. This procedure becomes second nature after a few Flight Simulator practice sessions.
The illustration above shows the aircraft nicely tracking inbound—no wind—on the 075° magnetic bearing to the Provincetown—PVC—beacon. Three simple flight maneuvers, as shown in the illustrations below, will accurately put you on any inbound or outbound NDB bearing. Here, the desired bearing is 075° to the PVC beacon to line up with Provincetown's Runway 7.
- Turn to the desired bearing (075°), and note the number of degrees of needle deflection to the left or right—in this case it's 50° (125° bearing minus 075° heading). Then double this amount to determine the interception angle (100°).
- Turn toward the needle the number of degrees determined above (100°). Adding that to the desired bearing—right turns, add numbers; left turns, subtract numbers—gives an intercept heading of 175°.;
- Maintain the new intercept heading (175°) until the needle points to the desired bearing (075°). Then turn to the (075°) bearing. Of course, the turn should be started shortly before the desired bearing is reached so as to roll out on the correct heading without any overshoot
With no wind you need only continue on the 075° inbound heading to Provincetown. But there is always wind. The next chapter provides you with the techniques to correct for the effects of the wind.
But first, open up your Flight Simulator and randomly select an NDB. Then choose a bearing to that NDB and practice intercepting it from several positions around the NDB. Do this for several other randomly chosen NDBs until you can comfortably and accurately intercept any bearing to an NDB no matter where you are or your direction of flight in relation to the NDB.
 Nothing is quite so important as recognizing when your RMI cannot receive signals. The situations that create that dilemma are:
- The ADF Receiver is turned off.
- The ADF Receiver is not tuned to the station.
- The NDB is too distant to provide a reliable signal.
- The aircraft's altitude is too low (reception is generally reliable at and above 1000 ft AGL).
When "Off," or receiving no usable signal, the RMI needle points directly to the right, 90° away from vertical. In addition to that, the digital bearing indicator on the Nav Trainer's panel also displays three dots as shown in the illustration.
Now, click on the Tracking button to learn how to get to and from an NDB as easily as if it were a VOR station.
Site best viewed at 600 × 800 resolution or higher.
© 1999 – 2008, Charles Wood.