
Localizer Approaches
You've had plenty to read so far, so we'll get right into some flights. All flights in this section end with Localizer Approaches, with no vertical guidance information provided. Thus they all are non-precision approaches, and Minimum Descent Altitudes, MDAs, will apply.
Some pilots call non-precision approaches "Dive and Drive"—"Dive" to the MDA and then you're so low that you feel you could almost "Drive" to the runway.
Five practice flights provide lots of variety on types of Localizer approaches.
* * *
Flying the Localizer
Most of the skills learned when flying VOR approaches are applicable to Localizer approaches.
- Turn towards the needle to correct for drift—except for a Back Course approach when you do the opposite and turn away from the needle to correct for drift.
- Don't chase the needle.
- Establish the proper Wind Correction Angle very early in the approach.
- Stabilize the approach so that only power changes are needed for altitude changes.
The biggest difference, of course, is the four-times increase in sensitivity when tracking a localizer. Off course by one degree is a two-dot deflection on the Indicator gauge. A half-degree misalignment is one dot.
How do you correct a heading that is misaligned by one-half degree? You "kick it over." Yes, that means rudder pedals. And you kick the pedal on the side that you want to turn. Right turn. Right pedal. You simply don't bank a plane when you want to make a 1° heading adjustment.
One of the joys of flying the MS flight simulators are that the aircraft are generally very stable on heading. It's too bad the same can't be said for altitude stability. So once you have established your heading, your aircraft is likely to stay where you want it all the way down the pipe to the runway.
A joystick is the least satisfactory control when flying a localizer or ILS. It is very difficult to make small changes with a joystick. They are super in combat situations when you want to roll out of a tough situation, but not ideal for holding the localizer.
A yoke is the next step up from a joystick. It's easier to make small heading corrections with it than a joystick. The realism is more satisfying, too.
And, as mentioned, rudder pedals with a yoke is the best possible choice. Now you have the same control over your flight that a pilot flying the big iron has (and the same control as one who flies the small iron, too).
Something to think about when your tax refund arrives and you're puzzled about how to spend it.
* * *
The first flight is from Newburgh, N.Y., KSWF, to the Essex Co. airport, KCDW, in Caldwell, N.J.Localizer approaches are very similar to VOR approaches with a few slight differences. The most noticeable will be the increased sensitivity of the needle on the localizer indicator. As already mentioned, it is four times as sensitive as when the Nav receiver is tuned to a VOR signal.
Also recall that the OBS setting has no impact on the needle. So get into the habit of setting the OBS to the localizer approach course as a reminder of where you are going. It will be one less thing to write down or remember and it is always in front of you.
* * *
Stewart Int'l airport, Newburgh, N.Y. to Essex Co. airport, Caldwell, N.J.
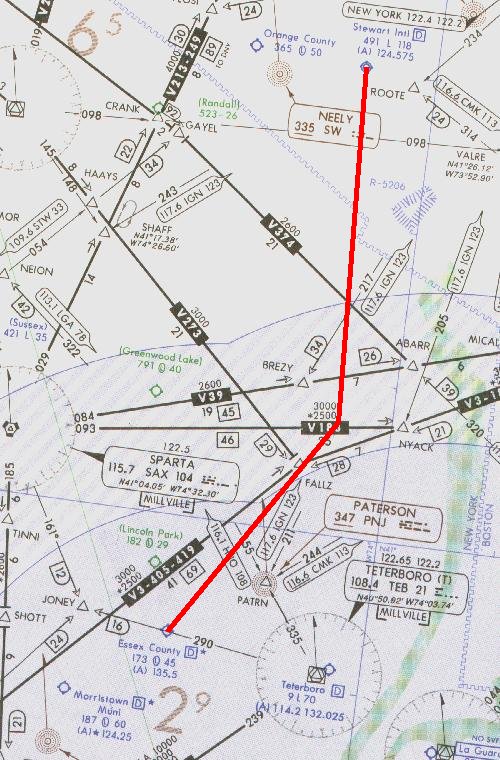
This first flight is easy and enjoyable. The flight begins at Stewart Int'l airport, KSWF, in Newburgh, N.Y. with a destination of Essex Co. airport, KCDW, in Caldwell, N.J. The localizer approach is to Runway 22. Click on the image above to download the flight-information package, swf-cdw.zip.
The zip-file includes the IFR chart, the approach plate for LOC Rwy 22 at Caldwell, and this text description of the flight.
We proceed south-bound from Stewart, tracking to the Teterboro VOR, but intersect the localizer to Caldwell's Runway 22., before reaching Teterboro. We turn right to track inbound to Caldwell with a straight-in landing to Runway 22. We must pass a VOR intersection after the FAF before descending below 800 ft.
As usual, do nothing until you have gone through the step-by-step details of the flight with this text and your charts. Only by doing this will you both understand the purpose of each step, but you will visualize them in your mind, a critical part of instrument flight.

NOTE: Fly the Instrument Approach portion with your Nav-2 Receiver for better needle visibility.
Set the flight simulator weather conditions to 1100 ft overcast, cloud tops at 10,000 ft., and two miles visibility. The wind is calm. Move the aircraft to Stewart's Runway 16, airport KSWF, and retract the flaps to 0°. Tune the Nav-1 receiver to the Teterboro VOR, 108.4 MHz., ident TEB. Set the VOR-1 OBS to the vicinity of 190°. You will center the needle with the OBS after takeoff and track that radial until intercepting Caldwell's localizer. Fly the first leg with Nav-1. Tune the Nav-2 receiver to Caldwell's localizer, 109.35 MHz., ident I-CDW.
- Set the VOR-2 OBS to 223°, the localizer track to the runway.
- Reset the timer to zero.
- Takeoff from Runway 16, climbing out with a modest right turn 190°.
- Fly Nav-1. When your VOR-1 comes alive, and warning flags disappear, readjust the OBS as necessary to center the needle. Observe that a TO flag is showing and then ident the VOR, TEB.
- Track that radial to Teterboro. ATC has cleared you to 4000 ft. Climb at 90 kts., then cruise at 110 kts. after reaching your assigned altitude.
- You will intercept Caldwell's Runway 22 localizer before reaching the Teterboro VOR, about 13 min. into the flight.
- Begin your descent to 2000 ft. when the VOR-2 Localizer needle comes alive, i.e., when you can see movement towards the center of the gauge. Descent rate should be no more than 500 to 700 fpm.
- Note from the diagram on the approach plate that the 25 NM MSA is 3000 ft. You will intercept the localizer at about 18 NM from the field, putting you well within the 10 NM safe radius for the Localizer approach. Observe that the safe radius centers on the FAF, some 5 NM before the field. Therefore you can go immediately to the altitudes shown for the approach, which is 2000 ft, until reaching the FAF.
- Ident the localizer before committing to the right turn, I-CDW.
- Fly Nav-2. Turn right to heading 223° on intercept to track inbound to Runway 22.
- Continue your descent to 2000 ft.
- Slow to 75 kts. and drop one notch of flaps.
- Readjust the VOR-1 OBS to 323°—a FROM flag should appear. When that needle centers you are at the FAF for the Runway 22 approach. Monitor its progress to keep appraised of your relative distance to the FAF.
- Maintain 2000 ft. until the FAF.
- The Outer Marker beacon will sound out dashes at the FAF, and the Blue OM light will appear on the marker beacon receiver's indicator.
- At the OM, start your timer and start your descent to the 860 ft. MDA.
- Readjust the VOR-1 OBS to 303°. You may not descend below 860 ft before passing this intersection, even if you have the field firmly in sight.
- Hold your rate of descent between 500 fpm and 700 fpm. Passengers in unpressurized aircraft unaccustomed to flight will be uncomfortable with higher rates of descent.
- Don't chase the needle; it will be very sensitive as you near the runway. Just try to keep it from moving.
- At 75 kts., 4 min., 14 secs. will elapse to fly the 5.3 nm. to the MAP or Runway 22 threshold.
- With two-miles visibility, Runway 22's threshold or approach lights should become visible in 2 min., 38 secs.
- Caldwell's field elevation is 173 ft., so you will have a minute and a half to descend 687 ft. for touchdown. Slow the aircraft for a normal landing by reducing power and further lowering the flaps.
- Good job; have a cup of coffee. The Boss said he'd pay for it.
- Flight time: About 25 minutes.
* * *
Manchester, N.H. to Beverly, Mass.
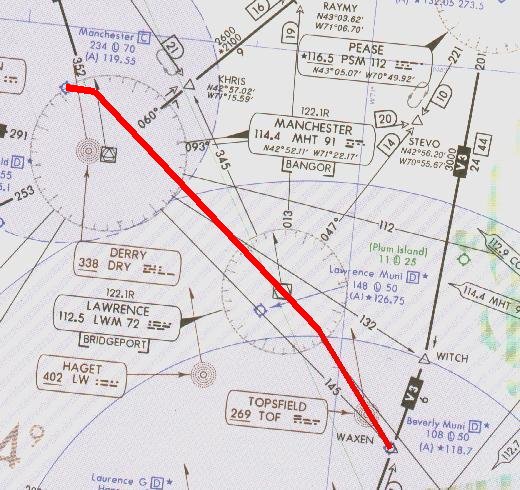
Manchester, N.H. to Beverly, Mass. with localizer approach to Runway 16. Click the image to access the complete flight-information package.
This flight is somewhat shorter than the first flight but a little busier during the final approach. The flight begins at Manchester airport, KMHT, in Manchester, N.H. with a destination of Beverly, Massachusetts, KBVY. The localizer approach is to Runway 16. Click on the image above to download the flight-information package, mht-bvy.zip.
The zip-file includes the IFR chart, the approach plate for LOC Rwy 16 at Beverly, and this text description of the flight.
We proceed south-east bound from Manchester to the Lawrence VOR, then intersect the localizer to Beverly's Runway 16., making a right turn to track inbound to the airport with a straight-in landing to Runway 16. A VOR intersection is the FAF for this approach.
As usual, do nothing until you have gone through the step-by-step details of the flight with this text and your charts. Only by doing this will you both understand the purpose of each step, but you will visualize them in your mind, a critical part of instrument flight.
NOTE: Fly the Instrument Approach portion with your Nav-2 Receiver for better needle visibility.
You'll use your DME to identify the FAF.- Set the flight simulator weather conditions to 800 ft overcast, cloud tops at 10,000 ft., and two miles visibility. The wind is calm.
- Move the aircraft to Manchester's Runway 17, airport KMHT, and retract the flaps to 0°.
- Tune the Nav-1 receiver to the Lawrence VOR, 112.5 MHz., ident LWM.
- Set the VOR-1 OBS to 145°. Fly the first leg with Nav-2.
- Tune the Nav-2 receiver to Beverly's localizer, 110.5 MHz., ident I-BVY.
- Set the VOR-2 OBS to 157°, the localizer track to the runway.
- Reset the timer to zero.
- Switch your DME to Nav-1 receiver to monitor progress to LWM VOR.
- Fly Nav-1. Takeoff from Runway 17, climbing out with a modest left turn to intercept LWMs 145° radial. A TO flag should appear. Ident the VOR.
- ATC has cleared you to 3000 ft. Climb at 90 kts., then cruise at 110 kts. after reaching your assigned altitude.
- Be alert for station passage at LWM as things will get busy.
- On station passage at LWM, when the FROM flag appears, continue on your 145° heading.
- Begin your descent to 1800 ft.
- Switch your DME to Nav-2 receiver.
- Fly Nav-2. Turn right to 157° as you intercept the Runway 16 localizer.
- Slow to 75 kts. and drop one notch of flaps.
- The FAF is 5.9 DME from KBVY, on Nav-2 .
- Maintain 1800 ft. until the FAF.
- At 5.9 DME, the FAF, start your timer and start your descent to the 580 ft. MDA.
- Hold your rate of descent between 500 fpm and 700 fpm.
- Don't chase the needle; it will be very sensitive as you near the runway. Just try to keep it from moving.
- At 75 kts., 4 min., 00 secs. will elapse to fly the 5.0 nm. to the MAP or Runway 16 threshold.
- With two-miles visibility, Runway 16's threshold or approach lights should become visible in 2 min., 24 secs.
- Beverly's field elevation is 107 ft., so you will have about one and a half minutes to descend 473 ft. for touchdown. Slow the aircraft for a normal landing by reducing power and further lowering the flaps.
- Safe landing, the runway will be wet.
- Flight time: About 19 minutes.
* * *
LDA Approach vs. Localizer Approach ... Is there any difference?
Not much, actually. If you've thumbed your way through an FAA volume of instrument approach plates you'll have noticed an occasional heading such as LDA Rwy 2, and the like. Although they're not common, you may encounter a Localizer-type Directional Aid in your Flight-Simulator travels.If you stay on course with a conventional localizer approach it will roll you down the centerline of the runway. That's why Cat II and Cat III ILS approaches are possible.
The LDA is the same as a localizer, but off-set from the runway heading. It provides course guidance down to a point from which you can proceed to the airport by visual references. Terrain features generally force the installation of an LDA approach system; it's the skyscraper, or 1000-ft. TV tower, or granite hill on the normal approach path that prevents using the conventional localizer.
Chester, Connecticut to Hartford, Connecticut

This next flight culminates with an LDA approach. Think of it as one more way to keep final approaches from becoming too boring. It's very short and begins at the Chester, Connecticut, airport, 3B9, KSNC in FSX, where you earlier began a flight leading to a VOR approach. We're heading in a different direction this time, to the Hartford-Brainard airport, KHFD, in Hartford, Connecticut.
The LDA approach at Brainard is to Runway 2. Click on the image above to download the flight-information package, chstr-hfd.zip. The zip-file includes the IFR chart, the approach plate for LDA Rwy 2 at Hartford-Brainard, and this text description of the flight.
The flight could hardly be simpler. We proceed northwest, make an easy intercept of the Runway 2 localizer into Brainard. After the FAF we cannot descend below the MDA until passing the Danns intersection, even if the field is in sight. Assume that this flight is under radar control, allowing the direct route to an intercept of the localizer.
Note: You may wish to fly this LDA Approach as if there were no radar vectors available. In that case you would be required to fly the PUBLISHED LDA Rwy 2 approach. On an Instrument Approach Plate the published approach is depicted by a bold line. Thus your LDA Rwy 2 Approach would include entry into the holding pattern with a right turn at the HF LOM and then one circuit around the racetrack. This also provides the opportunity to nail down the WCA for the inbound leg. Thanks to Burt Stevens for pointing out this requirement if not under radar control.
As usual, do nothing until you have gone through the step-by-step details of the flight with this text and your charts. Only by doing this will you both understand the purpose of each step, but you will visualize them in your mind, a critical part of instrument flight.
Remember, this is an LDA approach, Localizer-type Directional Aid, and the approach path is not lined up with the runway. A right turn is necessary upon reaching the runway to land. Going straight, without the turn, will bring you down onto the taxiway and into the control tower, a rather unsatisfactory ending to a good IFR approach.
NOTE: Fly the Instrument Approach portion with your Nav-2 Receiver for better needle visibility.
- Set the flight simulator weather conditions to 900 ft overcast, cloud tops at 10,000 ft., and two miles visibility. The wind is calm.
- Move the aircraft to Chester's Runway 35, airport 3B9, KSNC in FSX, and retract the flaps to 0°.
- Tune the Nav-1 receiver to the Hartford VOR, 114.9 MHz., ident HFD.
- Set the VOR-1 OBS to 278°.
- Tune the Nav-2 receiver to Brainard's Runway 2 Localizer, 109.7 MHz., ident I-HFD.
- Set the VOR-2 OBS to 002°. The Runway 2 heading is 23°, so anticipate a 21° right turn on arrival.
- Reset the timer to zero.
- Fly Nav-2. Takeoff from Runway 35, climbing out with a modest 10° left turn to a 345° heading to insure intercepting the localizer at a comfortable distance from the FAF.
- ATC has cleared you to 3000 ft. Climb at 90 kts., then cruise at 110 kts. after reaching your assigned altitude.
- Ident both the localizer, I-HFD, and the VOR, HFD. A FROM flag should be showing on the HFD VOR.
- On intercept of the localizer, turn right to 002° to track it inbound.
- Descend to 2200 ft.
- Slow to 75 kts. and drop one notch of flaps.
It's vital to stabilize the approach well before beginning your descent to the MDA.
- Watch the progress of the VOR-1 needle. When it centers you will be at the FAF.
- Reset the VOR-2 OBS to 023° the runway heading. Maintain 2200 ft. until the FAF.
- When the Outer Marker sounds, and the Blue marker light appears, with the VOR-1 needle centered from the HFD VOR, start your timer and start your descent to the 640 ft. MDA.
- Hold your rate of descent between 500 fpm and 700 fpm.
- Reset the VOR-1 OBS to 323°, the Danns Intersection.
- Don't chase the needle; it will be very sensitive as you near the runway. Just try to keep it from moving.
- Include VOR-1 in your instrument scan; you cannot descend below the MDA until passing Danns Intersection, when this needle centers.
- At 75 kts., 4 min., 20 secs. will elapse to fly the 5.4 nm. to the MAP or Runway 2.
- With two-miles visibility, Runway 2's threshold or approach lights should become visible in 3 min., 07 secs.
- One more time, this is an LDA approach. Anticipate a right turn to 021° to land after sighting the runway.
- Brainard's field elevation is 18 ft., so you will have one and a half minutes to descend 622 ft. for touchdown, about 400 fpm.
- Slow the aircraft for a normal landing by reducing power and further lowering the flaps.
- The Runway 2 landing threshold is displaced 410 ft. Don't touchdown early.
- Pray that, before your next arrival here, a bulldozer removes what ever terrain features prevented this from being a standard localizer approach.
- Flight time: About 15 minutes.
* * *
Lebanon, New Hampshire to Springfield, Vermont
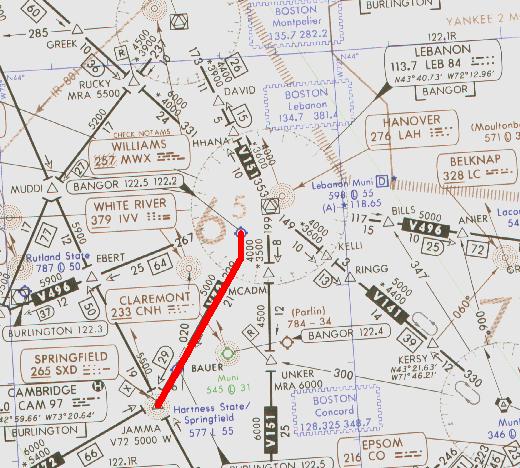
It's time to notch up the excitement a little. This flight has several new aspects: the Localizer back course must be flown to set up the approach, a procedure turn is needed to get turned around, and it all ends with a localizer approach to Runway 5, then circling around to land on Runway 23. Oh yes, and a climbing 360° turn above the Lebanon airport to gain some altitude before heading off toward the destination airport.
The flight begins at Lebanon Muni airport, KLEB, Lebanon, New Hampshire, with a destination of Hartness State airport, KVSF, Springfield, Vermont. A localizer approach to Runway 5 and circling to land at Runway 23 ends it all. Click on the image above to download the flight-information package, leb-vsf.zip.
The zip-file includes the IFR chart, the approach plate for LOC-A at Springfield, and this text description of the flight.
Recall that if an approach plate name ends in a letter, like LOC-A, rather than a runway number, then a circling approach is required. Looking at Springfield's LOC-A approach plate, you will notice that the localizer takes you right down the throat of Runway 5; a 050° localizer course to Runway 5 which is aligned to 050°. So what's the problem with a straight-in approach to Runway 5?
Your elevation above the runway threshold is the problem. The field elevation is 577 ft. and the MDA is 1660 ft., nearly 1100 ft, above the end of the runway. That's too high to safely descend and land, thus a circling approach is called for.
We proceed south-bound from Lebanon Muni, intercept Springfield airport's Localizer and then fly over the Springfield airport. We fly outbound on the localizer and enter a standard left procedure turn three minutes after passing the SXD NDB. We then return to the airport on the localizer, with SXD NDB the FAF for the approach. Descend to the MDA, circle the airport on sighting it, and land on Runway 23.
As usual, do nothing until you have gone through the step-by-step details of the flight with this text and your charts. Only by doing this will you both understand the purpose of each step, but you will visualize them in your mind, a critical part of instrument flight.
NOTE: Fly the Instrument Approach portion with your Nav-2 Receiver for better needle visibility.
- Set the flight simulator weather conditions to 1900 ft overcast, cloud tops at 10,000 ft., and two miles visibility. The wind is calm.
- Move the aircraft to Lebanon's Runway 18, airport KLEB, and retract the flaps to 0°.
- Tune the Nav-2 receiver to the Springfield Rwy 5 localizer, 111.3 MHz.
- Set the VOR-2 OBS to 230°, the back course to Springfield's Rwy 23.
- Tune the ADF to the Springfield NDB, 265 KHz., ident SXD.
- Reset the timer to zero.
- Takeoff from Runway 18, climbing out to the right with a full circling turn above the Lebanon airport. Set your initial climb rate at 800 fpm so that your altitude will be about 2000 ft when departing the airport on a course of 190°.
- ATC has cleared you to 6000 ft. Climb at 90 kts., then cruise at 110 kts. after reaching your assigned altitude.
- Maintain your 190° course until intercepting Springfield airport’s localizer (back course). The centering of VOR-2’s needle indicates that you have intercepted the localizer.
When your Nav-2 receiver picks up the Springfield Localizer you will be flying on the back course. This localizer is set up to guide you on a 050° heading to the vicinity of Runway 5 for the approach. But you will be tracking the localizer in the opposite direction, on a 230° heading. THE LOCALIZER NEEDLE OPERATES IN THE REVERSE DIRECTION WHEN YOU FLY THE BACK COURSE OF A LOCALIZER.
Instead of turning toward the needle if you drift off course, on the back course you must turn away from the needle.
- On intercept of the localizer turn to 230°. To stay on course fly away from the needle.
- Once you have intercepted the back course localizer, note the ADF needle. It should be on 230° and pointing towards the nose of the aircraft.
- Fly over the Springfield airport and continue outbound on the back course of the localizer. You will temporarily lose the localizer signal when you are over the airport but it will return as you continue outbound towards the SXD NDB.
- At station passage of the SXD NDB, when the ADF needle swings and points to your tail, start the timer and begin a descent to 4500 ft.
- Fly outbound for three minutes. Continue to be aware of the reverse sensing of the needle. Reduce your speed to 90 kts.
- At three minutes enter the left procedure turn, heading 185°
- Reset and restart the timer.
- Reset OBS-2 to 050° the localizer heading.
- After one minute in the procedure turn, turn right to 005° and return to the localizer course. Begin descent to 3500 ft., lower one notch of flaps and further reduce your speed to 75 kts.
- Reset the timer.
- As the needle centers turn right to 050° to intercept and track the localizer inbound. From here in you turn towards the needle to correct for drift, being on the front course of the localizer.
- Again, with no wind, the ADF needle should be pointing to 050° right on the nose of the aircraft.
- Your ADF needle will reverse direction at the FAF. Start the timer and begin your descent to 1660 ft.
- At 75 kts., 5 min., 26 secs. will elapse to cover the 6.8 NM from the FAF to the airport.
- You should spot Runway 5 after 3 min. 50 secs. with two miles visibility.
- On sighting the field, which will be nearly 1100 ft. below you, jog to the right and enter the left downwind leg to land on Runway 23.
- Descend to the 1400 ft pattern altitude then execute a normal left turn approach to Runway 23.
- Left base leg will be 320°. Land normally, being aware of the 100-ft. trees on either side of the runway.
- Give yourself a well-deserved pat on the back.
- Flight time: about 37 minutes.
* * *
The Localizer Back Course
The localizer antenna array is located at the far end of the runway, away from the approaching aircraft. Its antennas are arranged and manufactured in such a way to transmit a narrow signal on the runway approach path. That localizer signal is so accurate that with its guidance, along with the glide slope signal, an aircraft can safely land when the visibility is zero and when the ceiling is zero.
However, the Localizer antenna array also radiates a narrow signal beam in the opposite direction of the approach path. That signal is called the Localizer Back Course.
A prime advantage of the Back Course is that the airport gets it for free. It need only be tested and certified to become available to pilots "coming in from the other direction." It is an excellent alternative to a circling approach. As you will see in the next flight, approach plates are published specifically for the localizer back course.
Too many pilots shy away from a back course approach because of the reverse sensing of the needle. On the back course, one must correct drift with a turn away from the needle. Keep your wits about you, though, and you will quickly master the reverse sensing needle.
The Back Course localizer approach is a non-precision approach. There is no glide-path guidance with it. Glide-path signals from the front course may be received while on the back course, but you should ignore them.
Although a back course localizer approach is similar to a VOR approach, it has several advantages over a VOR approach.
- It is four times as accurate as a VOR approach.
- It can provide lateral guidance precisely on heading with the runway since the localizer antennas are in front of the runway, not offset to the side like an Omni antenna must be.
- It provides a signal for a single radial, the runway heading. Hence, no OBS settings are needed nor can they be set wrong.
- When used in lieu of a circling approach, the airport minimums are lower and the approach is simpler.
You'll enjoy the variety of a Back Course approach.
Marshfield, Massachusetts to New Bedford, Massachusetts
This may be your last opportunity to fly a back course approach. The FAA is decommissioning these sort of approaches and replacing them with GPS approaches. Microsoft uses the latest FAA data base when releasing new versions of Flight Simulator. The Back Course approach to Runway 23 of New Bedford, KEWB, was the only one listed in the New England book of approach plates.
We begin this last localizer-approach flight at 3B2 (although note from the approach plate that it is now KGHG), Marshfield Municipal Airport, in Marshfield, Mass. It’s a short flight, only 29 nm, but this back course approach has a 3.55° approach angle to New Bedford’s Runway 23, steeper than the normal 3.00°. We also provide you with a comfortable 30° intercept of the back course signal.
Because this is such a short flight, your “cruise” altitude will be 2000 ft, the initial approach altitude for New Bedford’s Localizer back course approach to Runway 23.
You will depart from Marshfield’s Rwy 24, maintain Rwy hdg until your ADF points 205° to FFF NDB, then fly to FFF NDB on the 205° bearing and on to the 30° intercept of the back course localizer.
Click on the image above to download the flight-information package, 3b2-ebw.zip. That zip-file includes the IFR chart, the approach plate for LOC-BC Rwy 23 at New Bedford, and this text description of the flight.
As usual, do nothing until you have gone through the step-by-step details of the flight with this text and your charts. Only by doing this will you both understand the purpose of each step, but you will visualize them in your mind, a critical part of instrument flight.
NOTE: Fly the Instrument Approach portion with your Nav-2 Receiver for better needle visibility.
- Set the flight simulator weather conditions to 700 ft overcast, cloud tops at 10,000 ft., and two miles visibility. The wind is calm.
- Move your aircraft to 3B2, Rwy 24.
- Tune Nav-2 to 109.7, New Bedford’s localizer frequency.
- Set the VOR-2 OBS to 234° as a reminder of New Bedford’s Rwy 23 heading.
- Switch your DME to Nav-2. You will need it during the approach.
- Tune your ADF to 257.0 kHz, for FFF NDB.
- Takeoff from Rwy 24 and maintain runway heading.
- Climb to 2000 ft.
- When the ADF nears 205° (about 5 nm after takeoff) turn left and fly the 205° bearing to FFF NDB (about 10 nm).
- Drop one notch of flaps and slow to 75 kts on the way to FFF NDB.
- Shortly after station passage of FFF NDB you will intercept the localizer for New Bedford’s Rwy 23.
- Turn right to 234° and fly the localizer back course. Recall one more time that you fly away from the needle to keep it centered.
- At DME 9.8 descend to 1900 ft.
- At DME 4.6, the FAF, descend to your MDA, 460 ft.
- When the approach lights or Rwy 23 is visible land normally.
- Flight time: about 22 minutes.
* * *
This is the end of the localizer approaches. You've flown five of them and your last ones should have been pretty good. With this experience behind you, go back and fly the five approaches one more time. You'll be pleased at how well you do.
The next piece in the ILS approach is flying the Glide Slope. Click the Flying the Glide Slope button below to get started.
Site best viewed at 600 × 800 resolution or higher.
© 1999 – 2008, Charles Wood.